Thursday 20 October 2016

Fruity Mincemeat

Take 40 minutes out of your day and make enough mincemeat to see yourself and half your family through the mince-pie eating season! I usually keep a few jars for myself and use the rest of the mincemeat to give away as early Christmas treats. Buy some nice new jam jars (loads available online!) fill to the brim with this pretty mincemeat (the cherries and cranberries make it far more attractive than shop brought stuff). Tie a piece of ribbon around the neck and take as a gift to friends when you visit during November and December. Everyone likes unexpected gifts and it gives them a chance to use it when making their own mince-pies before Christmas.


Ingredients to make  roughly 3lb mincemeat

4 bramley apples, peeled, cored and grated
12oz light muscovado sugar
Zest and Juice of 1 orange
Zest and Juice of 1 lemon

1 tsp ground cinnamon
¼ tsp each of ground nutmeg, cloves and allspice
4 oz dried cranberries
4oz golden or flame raisins
4 oz large sultanas 

4 oz glace cherries

3 ½ fl oz brandy
3 oz flaked almonds
4 oz vegetable suet

Put the grated apple and any juices, sugar, zests and citrus juices into a large saucepan. Bring gently  to a simmer, stirring until the sugar has melted. Turn off the heat and stir in the spices, dried fruit and brandy. Set aside to cool.

Once cool, stir in the almonds and suet.

Divide between sterilized jars. Press down to push out any air between spoonfuls and seal.

Will keep unopened in the fridge for months, so perfect to get some Christmas cooking out of the way during Autumn!

*Add a tablespoon or two of this mincemeat to a basic flapjack recipe for a seasonal twist! *

Saturday 9 January 2016

Mexican Guacamole Recipe


I've had a winter job in a warehouse the last couple of months. Whilst I've gotten to know some great people, I think the best thing to come out of the experience has been getting this recipe from one of my Mexican co-workers! It is lumpier than the guacamole you will generally find in little tubs at the supermarket and I much prefer it. If you prefer your guacamole smooth you can mash this just the same when you've made it.

The ingredients here are what I typically make up for the two of us as an evening snack, so if you're making it up for a party I'd double or triple the quantities!

Ingredients

1 large, ripe avocado (If you wait until the avocado is almost too ripe you will get a nice consistency between lumpy and mashed once it is chopped, but this is sometimes difficult to judge!)
1 small red onion
1 very large firm tomato or 2 regular sized salad tomatoes.
1 tbsp chopped, fresh parsley
Juice of 1 lemon (or lime if you have one)

Put your lemon/lime juice in a serving bowl.
Skin and chop the avocado into small chunks. Place in the lemon juice and stir around to coat it.

De-seed and chop the tomato flesh into similar small sized chunks, then add to the bowl.

Finely chop the onion, add to the mix and stir well.

Mix in the chopped parsley and you're done! As I say, if you prefer your guacamole smooth you can certainly blend or mash it, but now I've tried it this way I much prefer the mix of textures.

The recipe can be adapted to your personal taste by adding chopped jalapenos, bell pepper, capers or olives (among other things!). 


Friday 30 October 2015

Autumn Pumpkin and Smoked Cheese Risotto (Vegan)


2 tbsp olive oil
1 large onion, finely chopped
Half a leek, sliced
smoked garlic gloves, finely chopped (often found on continental markets and in wholefood shops. Use ordinary garlic if you can't find any smoked)
10 oz fresh pumpkin flesh, shredded (I grate it!)
12oz arborio rice
4 fl oz white wine
1 1/2 pints vegetable stock (two stock cubes in boiling water is fine)
Half a 'Smokey Risella' vegan mozzarella, cut into smallish chunks (any mozzarella substitute can be used if you can't find the smokey one, but I find this adds wonderful flavour to an autumnal dish).
Half a block of vegan hard cheese, such as a mature cheddar alternative, grated.
1 large mushroom (optional)


Method

Heat the oil in a large saute pan. Add the onion and leek cook until they begin to soften. Add the garlic and pumpkin and cook to soften them too.
Add the rice and stir well to coat the rice in the oil. Pour in the white wine and allow to reduce before starting to add the stock. It is best added half a pint at a time and allow the liquid to reduce before adding another. It takes about 40 minutes before the rice will turn translucent and all the stock will be used up. Keep stirring regularly as you do not want it to stick to the pan.

If you want to include mushroom cut it into sections and fry it off in a little olive oil.I add this as an option because I'm not fond of mushrooms and my other half loves them, so I usually cook a few separately and add them to the top of his serving!

When the risotto is creamy (not too liquid, but not a stodgy lump!) take it off the heat. If it is too dry add some boiling water and stir until it has started to be absorbed, taking it off the heat before it dries out again)

Add the smokey mozzarella to the risotto and stir in so it just begins to get soft. It doesn't matter if it doesn't melt immediately as by the time it's served up it will have done it's thing.

Spoon the risotto into your serving dishes and sprinkle over the grated hard cheese. Top with mushrooms if you are using them.
Serve as soon as possible so that the cheese is still melting when it is brought to table.


Thursday 8 October 2015

Tomato and Basil Gnocchi

Gnocchi is one of those great back-up ingredients that it's really useful to keep in the cupboard. Of course it's great if you make it yourself, but I always have a pack of two of the ready made stuff in the dry stuffs cupboard as it usually has a good long shelf life. 


This simple but filling recipe is quick to make and the quantities here fed two of us nicely.

Ingredients


  • 2 tbsp Olive Oil
  • 1 Red Onion, finely chopped
  • 2 cloves of Garlic, finely chopped
  • Half a Leek, sliced
  • 1/2 tsp dried Oregano
  • 1/2 tsp dried Basil
  • 1 can Chopped Tomatoes
  • 2 tbsp Green Pesto
  • Handful of fresh Spinach leaves
  • 1 pack Gnocchi
  • 8 Green Olives, halved
  • Fresh Basil leaves to garish if you have them
To begin, fill and boil a kettle of water ready for when you want to cook the gnocchi.

In a large frying pan over a medium heat, start to fry the onions and leeks. Its best not to cook these too fast or too hot as they add a nicer texture to the dish if the onions still have some firmness in them. After a few minutes add the garlic. 
Add in the can of chopped tomatoes and their juice, followed by the oregano and basil. Stir well and allow to heat through. Stir in the pesto, olives, and spinach, then rest over a low heat to gently simmer while you begin to do the gnocchi itself.

In a separate pan empty in the pack of gnocchi and pour over the boiling water from the kettle. Put on the hob, bring to the boil and then reduce to a simmer. Gnocchi should only take a few minutes to cook and you'll tell when it's done as it will rise to the surface of the water. 

When the gnocchi has risen drain in a colander and shake off all the water.

Ladle some of the tomato sauce into two pasta dishes top with the gnocchi. Garnish with a few basil leaves if you have them to hand. 


Sunday 6 September 2015

Eco Friendly Firelighters - How to Use and What to Expect


If you've ever visited my facebook page or Folksy and Etsy shops, you'll probably be aware of my homemade eco-firelighters. In this update I'm going to tell you how I made them and how to get the best out of using them.

I have always lived in a home with an open fire or stove. I grew up with my parents using those stinky and remarkably non-eco petroleum based firelighters, bought in a box and broken up into chunky white blocks. When it came to creating a more eco-sensitive home, the idea of making things instead of buying them was really important to me. I wanted to make what I could from recycled materials and if I did have to buy materials I wanted them to be all natural and sustainable materials. Petroleum firelighters went against most of these ideals. 

I looked up a few videos and posts online to see how other people went about making natural fire starters. There were a lot of variations. There were a lot of very decorative and very expensive ones too. I've seen some beautiful creations using pine cones, scented waxes and even cinnamon sticks. I loved them and I imagine they must smell divine. I decided though (as mine needed to be cheap enough to use every day if necessary) I would have to make mine as economical as possible. I didn't want to buy things especially for them, so I started to look at what I had at hand. 

It seemed I needed some sort of dry contents, so I chose wood shavings and dried flowers. I have a cottage garden, so drying my own flowers was cheap and added a little luxury to an otherwise functional creation. The wood shavings I have in abundance as my father is a wood-turner. The wax that would be used to bind it all together came from accidents and failures from my candle making activities. As a mixture of left-overs, the wax smelled pleasant but indefinable. It reminded me of my Grandad's kitchen, as he used to re-melt candle stubs to use again. The wicks in the firelighters only needed to be about an inch long, so I used trimmings from my container candles.

The first attempt at firelighters were made in an ice-cube mould. I stuffed it with dry bits stuck in the wick and filled it with wax. It actually worked okay, but I found that the wax dribbled away quickly on melting and didn't always burn once away from the main lighter. I decided I needed a case to keep the wax burning with the dry bits. Egg boxes seemed about the right size, so I ditched the ice-cube tray and filled the egg box cups with the wood shavings, dried flowers and wick. I noticed on filling that the cardboard absorbed some of the liquid wax. This proved really useful, as on burning it turned the whole firelighter into a giant wick and burned for a good eight to ten minutes. I used these for a few months in our fire at home and they always did the job. Then I went over onto a vegan, plant-based diet. No more egg-boxes to use.

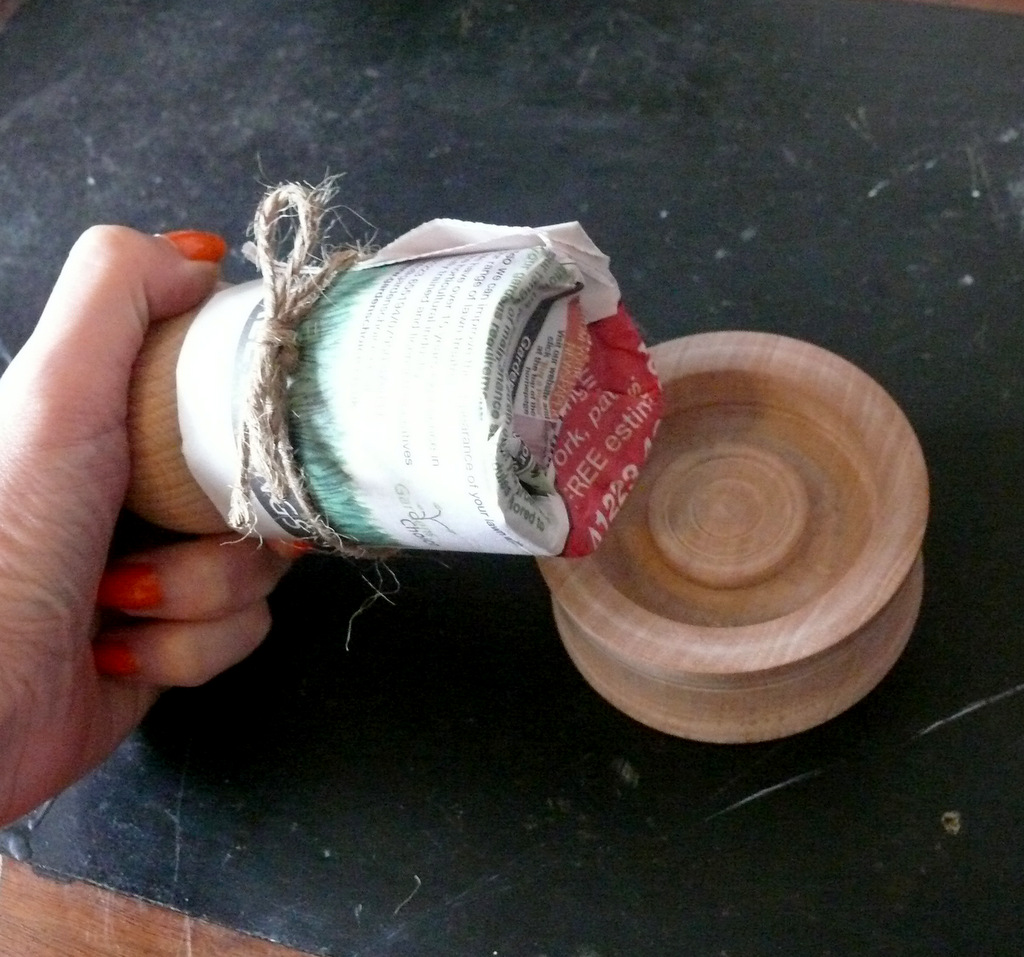
I decided that I could do without the egg-boxes.  I save all my newspapers and I decided any paper based cup would work the same way. I soaked the newspaper strips down and moulded them into a mini-cup cake pan. I let it dry and made then next batch the same way as I would have with egg box cups. I was pleased to find that there is no difference in burning time and aside from looking slightly more rustic, they work exactly the same.

 Using Eco-Friendly Firelighter:

As ever, you must observe fire safety advice when using any flammable item. These are destined to be lit for use in open fires, stoves, bbqs or camp fires. Never light before you're ready to put them in the fire and never place lit fire lighters on surfaces outside of the fire grate area. These are not like tea lights or candles that remain contained - the whole firelighter will ignite and should be treated with the greatest care. 

Ideally make a flat bed of wood to place the firelighter on. It is best to place the firelighter in the centre of the firepit and light with a taper or long match. If you're unable to do this carefully hold the firelighter and light the wick, moving it quickly into place before the wick burns down to the main body of the firelighter. 

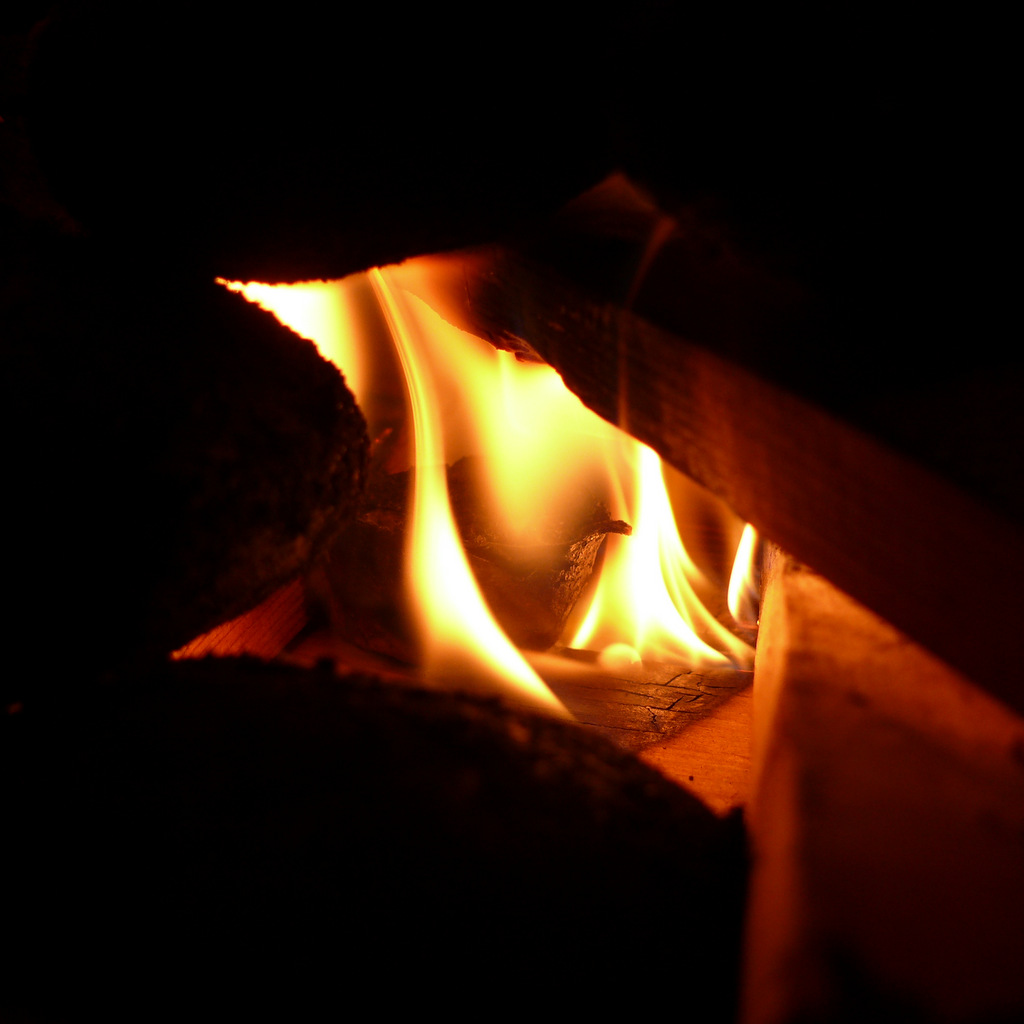
I would always recommend getting the fire going with a few pieces of kindling, regardless of whether you're generally burning coals or wood.  Place a couple of bits of kindling either side of the firelighter and one or two pieces over the flame. Be careful not to smother the flames; you want to allow the air to flow around the flame to catch the wood alight. 


 Once you have a few pieces of kindling alight it should be alright to build up the fire around it with more wood or coals.


After 2 minutes burning


After 3 minutes
Whilst it's tempting to set loads of firelighters burning and have multiple point of ignition, it shouldn't be necessary. Fire spreads, so if you get one area well alight, you'll soon have a good fire going throughout. If you are having trouble getting the flame to catch it could be because of what you're trying to burn. Newly cut or damp wood is best avoided as it really won't hold a flame for long, so always choose really dry kindling. Likewise with coals, which take a greater heat to catch. If the material isn't catching quickly enough then wait for the first firelighter to get a good way through it's burn time before lighting a second one. Some patience is usually needed in lighting a good fire. Lighting three firelighters at once will still only give you eight or ten minutes burn time, where as by staggering your use of firelighters you can keep a fresh flame going for twenty to thirty minutes, which is more than enough time to get even inadequate materials ablaze.  

After 4 miuntes
After 5 miuntes

After 9 minutes
Whilst I would always advocate trying to make things yourself before buying things ready made, I would urge caution trying to make these if you're not familiar with using melted wax. It's not for children or clumsy adults as hot wax can cause severe burns! Stay safe if you try it, or consider buying some ready made - there are lots available to try out there in internetland! Mine can be purchased via Folksy in sample packs of four or more economical packs of 25. I've been asked why I charge the prices I do for something that I promote as being made from essentially 'free' materials. Well, the short answer is that they take hours to make. They are all hand-poured individually and the paper cases are pressed by hand. As much as I'd love to convert everyone to the eco way buy handing them out for free, instead of cheapy petroleum ones, I simply can't afford the luxury of doing that. When you buy these, you're not only buying the time and care I put into making them, you're doing something far greater; you're choosing sustainability over the use of fossil fuels. You're choosing to put the planet and all it's inhabitants before the convenience of mass-production. I don't care if you buy mine, someone elses or some from the wholefood store down the road, I just want you to buy sustainably! 


 If you've tried making you own, or found some that you love, please let me know! I support all eco-friendly makers and I'd love to see what everyone else is doing to save the planet!


Monday 17 August 2015

Three Plum Oaty Crumble Recipe


Crumble has to be one of my all time favourite puddings. So adaptable and so comforting! You can mix and match fruit, add nuts or spices, then serve with either soya cream, custard or dairy free ice-cream! This recipe can be used a a good base to start from, then adapted to your own fancies.

I seem to have a glut of plums and greengages in the kitchen at the moment, so I've decided to make a three plum crumble to make the most of the variations in some of the old English varieties we have to hand. You can of course use any plums or gages, but today I'm using Victoria, Pershore and Czar. Naturally there will be some noticeable size difference between the varieties, so you will have to gauge how many you might need according to the size of your baking dish. Ideally you're looking to fill half to two thirds of the dish with fruit. I'm using dish eight inches square.

Ingredients

For the fruit bottom:

  • 7 large plums, stones removed and sliced.
  • 15 small plums, stones removed and sliced
  • 1 tbsp flour
  • 1 dessertspoonful dark muscovado sugar
  • 1 tsp ground allspice
For the topping:

  • 2 cups porridge oats
  • 1 cup flour
  • 4 tbsp maple syrup
  • 4 tbsp olive oil
  • 1 dessertspoonful cinnamon sugar
Preheat your oven to 200 C

Start by preparing the fruity bottom. In a small bowl mix together the 1 tbsp flour, the muscovado sugar and all spice. The sugar is to help against the tartness of some of the plums. If you have especially sweet fruit you can do without it, but for fruits with a sharpness like plums or cooking apples I would usually douse in plenty of sugar. By mixing flour with the sugar it will be easier to use and will be flavoursome thanks to the allspice. 

Layer the plums in the bottom of your baking dish neatly so that the whole base it covered. Sprinkle over half the sugar/flour/spice mix. Add another layer of fruit and use the rest of the sugar mix on top. Set aside while you make the topping.

In a large mixing bowl combine the oats, flour, maple syrup and olive oil. Stir well, ensuring there are no dry patches of flour nor over sticky clumps when you're done.

Spoon the oat topping over the fruit and fill any gaps along the edges. Try not to compress the mix too much, although it is okay to neaten it off and tidy up the top with the back of a spoon. Finish off by sprinkling over the cinnamon sugar.

Place in the lower half of your oven and bake for around 30 minutes. The top should just be browning and the fruit underneath bubbling happily.

ALTERNATIVE: Try using greengages instead of plums as the fruit and mixing in flaked almonds to the topping.


Tuesday 4 August 2015

Easy Chili Recipe (Using Dried Soya Mince)


I like to keep my dry store well stocked. One of the most useful ingredients in there is dried soya mince. It can be used for so many recipes, from lasagne to bolognese. In this recipe I'll be using it as a base for a great meat-free chili.I always used to use frozen mince for my recipes, but these days I am making more and more things from the store cupboard or fresh out of the garden.This recipe can be made as mild or fiery as you like just by using different types of chili and increasing or decreasing the spices. This will be a matter of trial and error on your part to some extent to make it your own, but the ingredients here make a palatable level of heat for most people.

I recommend reading through the method before you start as you can have some things cooking while you're attending to other parts of the meal! 

Ingredients

  • 100g dried soya mince, washed and simmered in 300ml boiling water
  • 2 tbsp rapeseed oil for frying
  • 1 large red onion, chopped
  • 1 red chili, finely chopped
  • 2 garlic cloves, finely chopped
  • 2 tsp paprika
  • 2 tsp cumin
  • 1 tbsp tomato puree
  • 400g can kidney beans (rinsed under cold water) You could substitute other beans if you have them, but make sure they're soaked and cooked first.
  • 400g can chopped tomato


Cooked rice to serve (follow the usual packet instructions or make according to your own taste). This can be cooked while your mince is simmering.

Method


In a saucepan over a medium heat simmer your mince in the boiling water until it absorbs the liquid and swells. Make sure all the liquid is used and give the mince a stir to break it up. Set aside.

In a large, heavy bottomed frying pan heat the oil and add the chili, onions and garlic until they start to soften.


Add the mince and then all the remaining ingredients (except the rice of course!). Stir together and allow to simmer over a low heat. 


Once the rice is cooked, drain off over the sink. It's up to you how you 
serve. You can keep the chili and rice separate and serve side by side on the plate, but I prefer to mix the chili and rice together in a massive bowl and let people help themselves at the table. Whatever you choose, do it quickly as it all cools down quite quickly.


Sunday 19 July 2015

Handmade How To: Daily Toning Skin Cleanser with just two ingredients!


In keeping with my desire to eliminate micro-plastics, chemicals and things I can't pronounce from my daily routines, it became necessary for my to start making my beauty products at home. Not only did this simplify my whole routine, it saves me money and ensures I know exactly what I'm putting on my skin! I'm 35 now and I've always had difficult skin. Sometimes its dry, sometimes it's oily. Sometimes it comes out in blemishes. At certain times of the month, my hormones send it into some sort of panicked combination of all of them! I also used to use lots of make up, make-up removers, toners, cleansers, moisturizers, scrubs and face-masks. Not only did they cost a small fortune, I was never convinced I looked any healthier for it. I'm now committed to keeping it simple and keeping it natural.

Witch Hazel is a natural astringent and is great for balancing oily skin. It also heals and soothes minor irritations, so is beneficial for problem skins. Rose water awakens tired skin and cleanse pores, removing residual make up along the way. 

This simple toner contains only two ingredients and acts a cleanser in my morning and evening routines. I only wear make up a few times a week, but when I do I use coconut oil to remove it before washing with a handmade natural, mild soap. I then apply the toner. If I've not been wearing make up, I tend just to wash with water and finish of with the toner. 

As ever, it's cheaper if you can afford to buy in bulk. However,  if you're just having a go, these ingredients you could get from local chemists and supermarkets. You will need:

  • Rose Water (the best quality you can afford. Make sure it's made from genuine rose oil and not a synthetic essence)
  • Pure Distilled Witch Hazel (Hamamelis Water)
  • Reuseable Glass Bottle

Because I am now making a lot of my own products I have bought a selection of glass bottles and jars online. I get mine, along with many of my supplies, from Baldwins as they stock a good selection of sizes at reasonable prices, though you can get them from many retailers. 

To make this cleansing toner, simply fill your bottle one third full with the rose water and fill the remaining two thirds with the witch hazel. Store somewhere cool and dark.

To use, just apply a little of the toner to a cotton pad and gently wipe over your face. Avoid the eye area and do not apply to broken skin! If you've never used either ingredient before, test on an inconspicuous area first. Although rare, some people are allergic to witch hazel and you don't want to find this out after using on your whole face. Should you present any adverse reactions or accidentally swallow the toner seek medical advice immediately! 


The best way to keep skin looking good is to reduce the toxins in your body by eating healthily and drinking lots of water! Avoid wearing make up every day. It's okay on occasion, but it does clog your pores and affects to youthfulness of skin. Keep your beauty routines simple and avoid loads of different products all doing different things. They all contain chemicals  (even manufactured ones branded as 'natural' for the most part) and they're all asking different things of your skin. Next time you're in your bathroom take a look what you're using. Do you know what those ingredients actually are? If not, why would you want them on your skin and in your body? I'll be sharing more of my homemade alternatives soon, so join my blog for more natural beauty tips coming soon!

Basic Risotto Recipe with Rocket and Fresh Vine Tomatoes (Vegan


This risotto recipe is the basic one I use when experimenting with ingredients. I have used a simple mix of rocket and tomato, but have added ideas for variations along the way! Freshly picked garden ingredients are always best, but a trip to the farmers market should get you some good fresh ingredients that haven't traveled too far.

I guess these ingredients would serve three or four, depending on your preferred portion size. I generally cook for the two of us, then have some the next day too. As ever I would recommend reading through the whole recipe before you start as I give you a few options and ideas for substitutions!

Ingredients


  • 4 tbsp Rapeseed Oil
  • 1 large Red Onion, chopped finely (I also added four baby shallots, cut into quarters, but these are vital if you don't have them)
  • 2 large Garlic cloves, chopped finely or crushed
  • 12oz Arborio Rice
  • 4fl oz Cooking Wine. White Wine is best, though I have used homemade wine before and it turned out just as well!!
  • large handful grated vegan Cheese. A strong cheddar style one was used in this recipe, but I have also tried a blue-style one and a smoked one before; they give good flavour according to your preferences, so are worth a try if you make this more than once!
  • 2 pints (just boiled) vegan Vegetable Stock
  • Handful of small, sweet vine Tomatoes, cut in half (Piccolo are a good variety). 
  • Handful of fresh Rocket leaves, washed. Baby Spinach, chopped Kale or Samphire (for those lucky enough to live near the sea!) work equally well and can be substituted or used as well.
  • 12 fresh clean Basil leaves (optional)
In a large, deep frying or saute pan heat the oil and begin to soften the onions, then garlic. Stir frequently until they appear to be cooking, but are not yet browning.

Add the rice and give a good mix until its all coated in oil and starting to heat. Let it cook like this for a couple of minutes before pouring over the wine. This will steam and fizz, then evaporate quickly. Now start adding the stock a cup full at a time, allowing much of it to be absorbed before the next cup is added. The pan should be on a steady simmer and not a boil at this stage. You want the rice to soak it up slowly and do not want it to be swimming in liquid all at once.Stir continuously to prevent the rice sticking to the pan.


Continue to add the stock until it's all used up. The rice should start to go translucent and upon tasting should be soft, without being crunchy when bitten.

When the rice appears to be getting near it's time, add the tomatoes and greens (whichever you choose to use) and stir into the rice. When it is right, it should be creamy in consistency, not sloppy nor dry!

Remove from the heat and stir in most of your cheese, saving some to one side. The cheese should start to soften and melt a little.

Take a little of your reserved cheese and sprinkle in the bottom of the bowls you will serve in. Serve up the risotto with a ladle into your bowls. Sprinkle the remaining cheese on top and garnish if you wish with another sprig of basil. Serve immediately.

Arborio rice is a useful thing to keep in the pantry as so many things can be made into a risotto! This basic method can be used to make all manner of interesting risotto combinations. You could use young asparagus tips, leek, courgette, spring onion, french beans or pumpkin just by adding at the beginning and cooking with the onions. I like to experiment with fresh harvests and use this recipe when I have only a handful of things ready to pick.  


Friday 10 July 2015

Spiced Rhubarb Cake (Vegan)


This is one of my favourite seasonal cakes. There is nothing quite like pulling the first bundle of rhubarb stalks from the garden! I used to make this a lot when I was vegetarian, so I wanted to see if it would work okay with an egg replacer. I'm pleased to say it does! It contains a lot of fresh rhubarb, so is a very moist, almost gooey cake that gets stickier after a day or so. It doesn't keep for long due to the fresh ingredient, but I've never had a problem with this as it's all eaten after a couple of days anyway!


Ingredients

5 oz Vitalite or vegan butter alternative
10oz Self-Raising Flour
2 tsp Allspice (or Mixed Spice if you prefer)
1 tsp Ginger
3oz Dark Muscovado Sugar
6oz Golden Syrup
1 tsp Bicarbonate of Soda
Vegg (Baking Mix) equivalent to 2 eggs
10oz Fresh Rhubarb, chopped into half inch bits

-

Heat oven to 180 C and put the kettle on. Grease and line a deep 20cm square cake tin (or loaf tin as I use).

In a large mixing bowl beat together the vitalite and sugar until light and fluffy. 

Beat in the golden syrup or use a mixer for ease.

Dissolve the bicarbonate of soda in 200ml boiling water, then gradually mix into the vitalite mix. 

Sift in the flour and spices. Mix briefly before adding in the egg mix.

Once mixed well, gently stir in the rhubarb.

Pour the mixture into the tin and bake for 50-60 mins, until the cake feels firm to the touch and springs back when pressed. It's difficult to check with the usual 'stick a knife in' method as even when cooked the rhubarb makes the middle quite wet. Try it anyway as it will be obvious if the centre to still too raw! My oven is rubbish, so it always take me longer to cook this than when I've made it elsewhere. I'd advise you to check on it regularly and be prepared to increase time if necessary.

Cool in the tin for 15 mins, then turn out and cool on a wire rack. Dust with icing sugar if you want to, but I never bother. It's lovely served with soya single cream or vanilla ice cream! 

Tuesday 7 July 2015

Potting Shed News: Eco Plant Pot Maker

As regular readers will know, I'm trying to develop a range of eco-sensitive products which can be handmade out of sustainable materials. With all the time I spend in the greenhouse growing our food, a paper pot maker has been on the list for a while! Well this weekend we had a go, putting the lathe into service and making a functional finished product.

I've seen them before and wanted to see if we could make one. It seemed like a good investment as it means never having to but plastic seed modules or pots ever again! Using them instead of plastic modules means less disturbance to the delicate new roots and less chance of me getting carried away and planting way more seeds than I have room for once potted on!  It turned out well and now I have no need to use plastic plant pots for my seedlings! We are now going to add these to the range in our Etsy shop, for all of those that don't have a lathe and so can't make one at home! My father has a huge pile of wood donated to him buy various friends that know he does woodwork. We're not always sure what sort of wood it is, but if we can we try to label it as it comes in and before it is put away to dry.  


The pot can made from recycled newspaper or (old/damaged book pages!). I prefer to secure mine with a little twine, just to make them neat, but this isn't vital as they'll work fine without securing. After a while the paper will start to break down and the whole thing can be potted on into something more permanent or planted out in the garden. 

To use you get half a sheet of newspaper. I've decided to make mine thicker, but you can make them using half as much paper, though the walls of the pot will be quite flimsy, especially once wet!


Fold the paper four times (in half and then half again)


Wrap around the pot maker and fold in the ends. You can tie with twine at this point if you like.


Firmly push into the pot maker base. This compresses the bottom so that it keeps its shape.


Carefully pull off the paper pot and it's ready to use! I line all of mine up into a seed tray, just to hold them upright and it's worth remembering that the less you can handle these the better once wet.


I've just listed my eco-pot makers on Etsy with worldwide shipping available. Although I would prefer people to source things as locally as possible to reduce pollution miles, I will post these out if you're unable to find a local, ethical maker! Woodturning is a popular hobby, so why not see if you have a local crafter willing to take commissions? To view our listing visit our Etsy or Folksy shop.


Fruity Mincemeat

Take 40 minutes out of your day and make enough mincemeat to see yourself and half your family through the mince-pie eating season! I usual...