I've always loved candles. Some I love for the wonderful scents they fill a room with, while others I will just light to watch the comforting glow of their flickering light. Nothing says 'sit a while and relax' more than a flickering candle in a darkened room. They are useful too of course; when the power goes out we all need something on hand to see by!
Container candles are the easiest and most inexpensive candles to make yourself. While I admit I can't always resist buying candles from craft fairs or high street shops (even though I make and sell them myself!) it's definitely cheaper to make your own if you use them a lot. They also make great homemade gifts!
In this post I'm going to share some tips on making your own basic container candle, with some ideas for making them a little more fancy for gift giving. I will also share where I buy my supplies from, though these may not be of so much use to those reading from outside Britain. I have added item links to the online shops I get my supplies from. A quick internet search will reveal dozens of candle-making outlets and it's sometimes fun to shop around to see what different companies are making. I have chosen my products based on my best experience, which does mean getting things from several different companies. You may prefer to save on postage and get all your supplies from one place. You will also find that buying in bulk is the most cost effective way to buy, however this only really works out if you're planning on making a lot of candles! To start with it's worth paying a little more and having a go until you've found products you're happy working with.
I will also note that for this method I am using
natural rapeseed wax. I mention this because for me, this is the most local, least air-miles option. Rapeseed crops are grown in swathes of sunshine yellow fields across the UK and Europe and as such, is slightly preferable than US grown
Soy. Naturally, if you are outside Europe, you may need to do a little research to find out what your nearest 'local' wax is. Rapeseed wax is relatively new and because the vast majority of candle-makers using natural wax utilise soy, it is a little more expensive. That said, when you look at how much you can get for your money, against the prices of some container candles for sale on the high street, it still makes sense in my opinion. Both rapeseed wax and soy work in similar ways, but you will find if you're making candles to give away that soy holds a colour better, so your finished product may be prettier.
First off, the very basics you need to make a functioning candle are:
For the Container Candle:
- Rapeseed Wax
- Wick (There are hundreds of variations, so the link here is to the multi-purpose wick I use in my little jars)
- Wick Sustainer (they're the little metal bits that hold the wick to the bottom of the container)
- Small Glass or Ceramic Container - I use 55ml/2oz jam jars, which burn for around 20 to 25 hours (it's best to use really large containers unless you use wood wick, as you may find that your wick isn't efficient enough to melt all the wax evenly - I will elaborate on wood wick further on...)
Equipment you'll need (the bottom two only apply if you're waxing your own wick):
- Microwave and a pyrex jug or hot plate and a bain-marie set up (I'll give instructions for both)
- Superglue
- Scissors
- Stirring stick
- Oven-gloves or heat proof cloth (the jug of wax will be very HOT!)
- An old rag to mop up any spills
- Twigs, broken kebab sticks or lollypop sticks (these are just to lean the wick on while the wax sets and stop it from slipping.
- Wooden peg (these I use to save my fingers from hot wax when pre-waxing wicks!)
- Crimpers or small pliers
To start with I must mention here that you'll be dealing with scolding hot wax while pouring! Do not allow children to be involved in this process; it's also probably safer to shut all pets out of the room you're working in too. Wear old clothes as wax/colour dyes/scent oils can all ruin a good outfit. Don't rush - wax takes a long time to set, so move slowly and pour steadily. Cover your work area with old newspapers or similar.
Preparing your wick and container
Depending on your budget you could buy ready waxed and tabbed wick - this may be easier for your first attempt. If you buy ready-waxed wick you'll need 80mm wicks for the small jars I've suggested. I make and use candles every day, so for me it is more cost effective to buy a roll of wick and a bag of sustainer tabs, then wax and cut them myself.
 If using ready waxed wick, skip this paragraph!
To prepare wick on the roll you'll need to cut off about a yard of the stuff and pop a wooden peg at the top (this is just so you can dip the whole wick without putting your fingers in the wax). Melt a small amount of wax (following instructions below, depending on whether you are using a microwave or hob). Dip the wick in the melted wax and ensure it's completely covered. I then use a second wooden peg to run down the length of the wick (see picture) to remove excess liquid from the wick.

Lay out the wick on a flat surface so that it's perfectly straight and allow to set. This shouldn't take too long. When it's hard, snip it into sections slightly longer than your container (so that it pokes out the top by half and inch or so). Using crimpers/pliers, pop a sustainer on the bottom of each wick and squeeze the neck together to hold the base of the wick in place.
Take your prepared wick and using a blob of superglue underneath the sustainer, stick it in the middle of your container. Allow to dry completely before pouring wax. Again, depending on your budget, you can buy wick tabs which can make this process easier and less messy. Your container is now ready for wax!

Measuring wax pearls is a skill I have never mastered, so for both methods of melting you will have to experiment a bit. If I melt too much wax for the containers I have prepared, I just pop it a mug and re-melt when I come to make my
eco-friendly firelighters!. Alternatively, if using coloured wax you can pour all your over-melts in different colours into the same jar (allowing for setting in between) to make a stripy candle!
To melt wax using a microwave and pyrex/heatproof jug:
I use a 1 pint jug and fill it about two-thirds full with wax pearls. It's quite amazing what this melts down to, but it's usually enough for a few little jars. Rapeseed is a very soft wax and melts down a little quicker than soy or blended wax. I have my microwave set on 50 - 70% power and usually put it on for around four minutes, then add a minute at a time after checking. When the wax is about 95% melted, with just a few opaque blobs remaining, you can take it out and give it a little stir. It is safer to do this than overheat it. Never leave the microwave going or put it on for more than a couple of minutes at a time - remember, wax is a flammable substance and it will reach a flash-point if heated too long. Always use oven gloves or a heatproof cloths to handle your jug as the pyrex can get very hot.
To melt wax using a hob:

You will need an old milk pan or small saucepan with pouring lip that you don't mind getting waxy. Put a cup full of wax in and then stand this in a pan of simmering water on the hob. You don't want to get the wax hot too quickly or allow it to boil so do not put the pan of wax directly on a hot plate. Using this method you can keep watch and remove the pan when the wax is melted. Never leave the hob unattended.

To make the candle: Once you have your melted wax, carefully pour it into the container. Don't fill it all the way to the top as rapeseed wax tends to dry unevely and will require a 'second pour'. This picture here shows the first pour and illustrates why a second pour is required. This just means you'll need to reserve a little of your wax so that when the container candle has set you can tidy it up with another layer of melted wax over the top. This shouldn't be the case with soy wax, so if using that you can fill to the final level.
Take one of your sticks and lay it across the top of the container, ensuring the wick emerges from its centre. Here I've just used other bits of wick!
Allow the candle to set. When hardened, trim the wick to around 7mm. There we have your basic, functioning candle! Next I will go through some variations on the method.
Larger containers and woodwick

As it's often possible to use any heatproof glass or ceramic container to make candles with, it's important to think about wicking. While it
is possible to select different wicks for different sized candles, unless you're going into business making candles and are prepared to do a lot of experimenting, it's a lot of work. I find that for anything over a 30cl tumbler glass or tea-cup sized candle it's easier to use wood-wick. It works well with rapeseed and give a gentle crackle while burning which is quite charming. You can buy woodwick and their special sustainers online. It comes in three sizes, though I tend to use medium for most of mine. The only time I use large wood wick is when making candles in half pint beer mugs.
When using wood wick you do not need to glue the sustainer in place as the wick is lowered into the wax after pouring and centred by eye. When set you need to trim the wood wick to about 5mm. If you leave too much wick exposed your flame will be too large and could be dangerous.
-
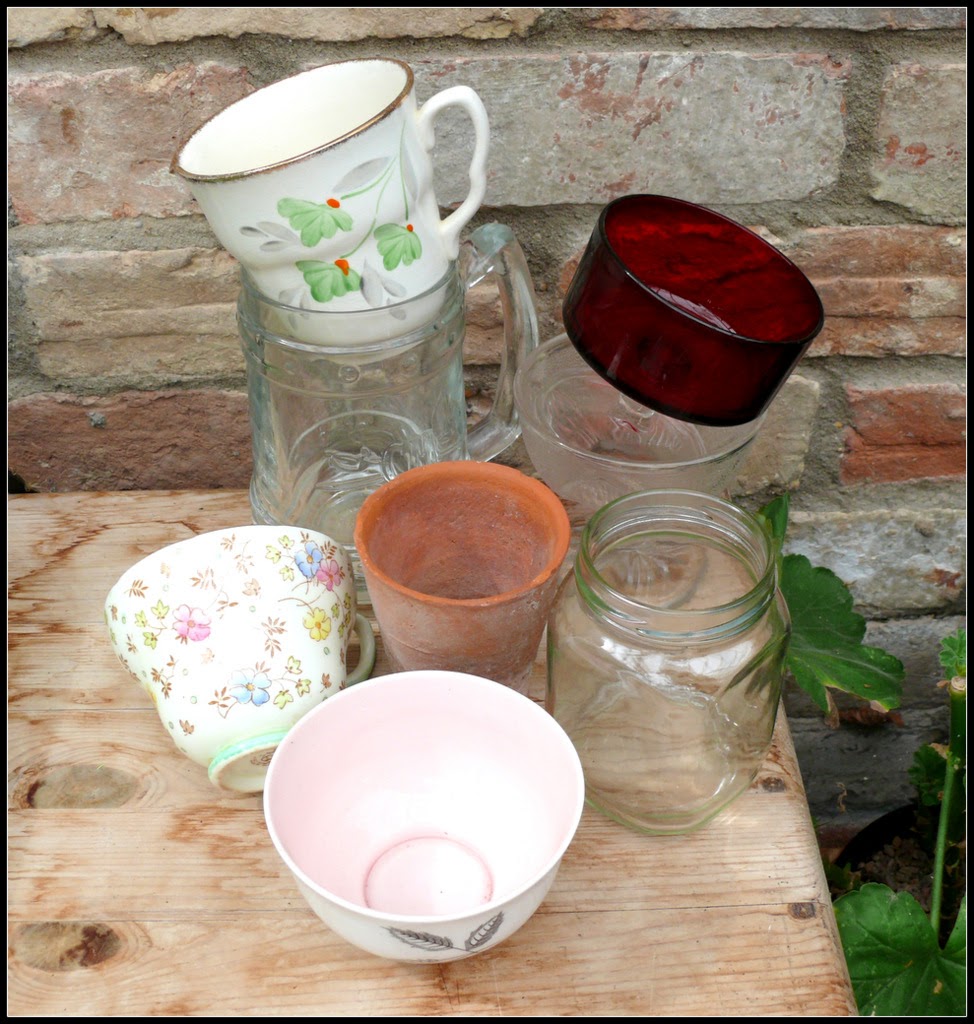
You can buy containers for the purpose of candle making online in various sizes, however it's worth remembering that anything manufactured new is not going to be as eco-friendly. I find it worthwhile keeping your eye out at charity shops and markets for unusual things to use. Teacups, sugar bowls and small dessert dishes are lovely if you're giving the candles away as gifts. Likewise half pint beer mugs and glass tumblers are usually made with a thick enough glass to be okay for use. Avoid glasses which are delicate and have thin walls as these can easily break or pop under sudden changes in heat. If you're making garden candles then you can use terracotta pots providing you seal the hole in the bottom with something flame proof. I've added a few photos here to show things I've turned into candles for my craft fairs...
Colours and Scents
I mentioned previously that rapeseed wax doesn't colour all that evenly, so I often leave the wax its natural creamy white colour, especially if I'm making them for myself. However, if you would like to try colouring or you are using soy wax (which colours well), then I'd recommend buying some little dye chips to have a go with. To use, just scrape off a few shavings into the wax just after melting, then stir until they've completely dissolved.
If you like scented candles then it's an easy matter of buying fragrances online. You can also use essential oils, for a more delicate and natural way to scent your candles. You usually need very little scent oil, so just add a few drops to your wax just after melting and give it a good stir. The fragrance will want to sit in a puddle at the bottom of the wax, so make sure you give it a good swirl just before you start to pour.
It is worth noting that both colours and scents have the potential to alter the burning of the candle. Try not to overuse them if you can help it. They are also non-natural substances, so if you have a mind for being eco-friendly then you may wish to leave the candle as basic as possible.
-
With these basics under your belt you can create your own supply of household candles as well as a really beautiful gifts. The great thing about these container candles is that the container itself can be refilled time and again. It is important to add safety information on any candles you are giving away or selling. You can buy warning labels for this purpose.


 When the root veg is tender allow it to cool a little, then drain off the stock and add it to a large mixing bowl. Add the shallot/mushroom/garlic mix to the bowl too. At this point you can pour in the think gravy and give it a good stir. Set aside while you see to the pastry.
 On a floured surface prepare to roll out the pastry. Before you start rolling, sprinkle the pastry with the dried herbs so these are pressed into the pastry as you roll. Use the pastry to line the bottom of a pie dish and neaten up the edges with a knife.
 Give the veg mix a good stir and pile into the pastry case. Lightly press out any air and smooth over the mound ready for a pastry top.
  Make four cuts in the top to let out the heat and brush the top with almond milk. Place in a pre-heated oven for 35 to 40 minutes. Ovens vary a great deal, so I advise you to start checking it regularly from about twenty minutes in....